| Author
|
Thread |
 
|
|
Sparky
Joined: 08 Dec 2003
Posts: 19083
Location: PDX10/15/13 12:47 PM |
Quill diameter?
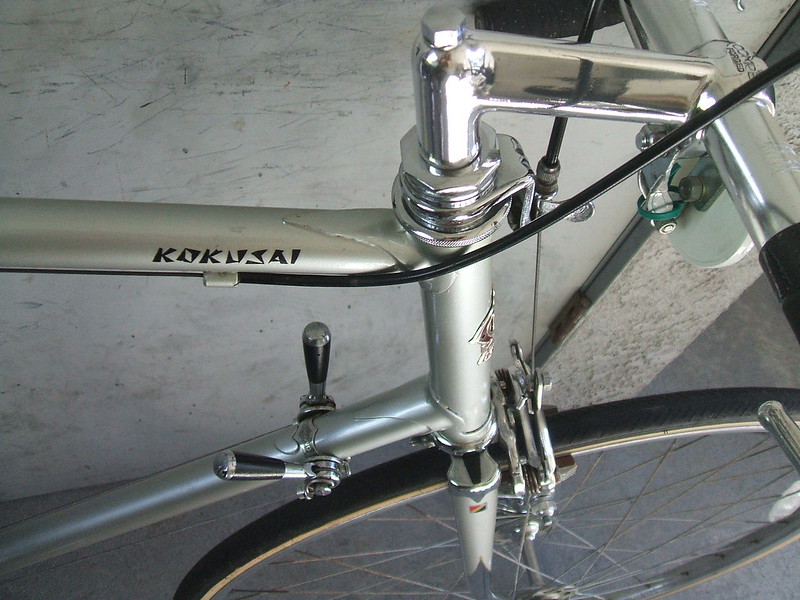
I got a nice Tange chrome lugged fork last week. The inside diameter is 22.8mm. Which make for inserting a quill stem in an interference fit. A visit to the Sheldon pages not helpful. A standard 600 headset bolt fits the thread, but it also has a crown race seat diameter of 27mm., nothing a shop with the right tool can't cut to 26.4mm. But the ID has me a little confused. Wondering if I will have to fill the thread with JB weld and make it a threadless at this point...
|
|
 |
|
|
|
|
|
Nick Payne
Joined: 10 Jan 2004
Posts: 2626
Location: Canberra, Australia10/15/13 1:44 PM |
Normal quill stem diameter is 22.2, so if the internal diameter of the steerer is 22.8 then it should be a loose fit and need a shim.
The unicrown fork on our old touring tandem is an early MTB fork which has a BMX threaded 1" steerer with an internal diameter of 21.15mm (0.833"). I suspect in the early days of MTBs that manufacturers were worried about normal road 1" steerers not surviving the thrashing they would get in an MTB, and that this was one attempted solution.
What I did I did to fit a stem in that fork was to chuck a Nitto Technomic stem in a lathe and turn it down from 22.2 until it was a good fit. Harris Cyclery do have a couple of quill stems that fit a 21.15 ID steerer, but they are made for 25.4mm handlebars (and pretty ugly and heavy as well). See
http://sheldonbrown.com/harris/opc.html#stem
|
|
|
|
|
|
|
|
Sparky
Joined: 08 Dec 2003
Posts: 19083
Location: PDX10/15/13 2:06 PM |
The Nitto i have looks like some sanding would get it in. Tempted to get a brake wheel cylinder hone and get into the steerer tube with it. But the wall thickness @ the slot for the key washer is only 1mm.]
|
|
|
|
|
|
|
|
dddd
Joined: 11 Jan 2004
Posts: 3345
Location: NorCal10/15/13 7:18 PM |
22.8mm id would be a mfg defect imo, leaving the wall thickness too thin for the threading.
If you meant 21.8mm, this would equally be a defect in a threaded steerer.
I suspect what you have here is a threadless-specific steerer that someone put threads on, and passed off this fork after discovering what they didn't expect to happen.
This would almost always be the case where an Al steerer was involved, although Alan of Italy did actually make some of their forks with a fragile 1" aluminum quill-type steerer which was prone to bulge-out cracking from the quill's expander.
Unless you can cut off the threaded portion and still have enough length for threadless installation, this fork is a big problem and likely a candidate for recycling.
|
|
|
|
|
|
|
|
Sparky
Joined: 08 Dec 2003
Posts: 19083
Location: PDX10/15/13 7:54 PM |
"I suspect what you have here is a threadless-specific steerer that someone put threads on"
I say no due to age and crown style. And where the chrome stops and the threads start. And yes my mistake, 21.8 maybe 21.7.
I could cut the thread off for a smaller frame as it is 9" to the top from the race seat. Most frames are smaller for what I ride. ;)
Steel fork and steerer, 1st gen threads and key washer slot from what I see.
Tange 6A is stamped into the steerer
|
|
|
|
|
|
|
|
Sparky
Joined: 08 Dec 2003
Posts: 19083
Location: PDX10/15/13 8:27 PM |
Some eBay browsing shows a few forks like this, one I saw had this in the text.
For 0.833"/~21.1mm stem, NOT 22.2mm
|
|
|
|
|
|
|
|
dddd
Joined: 11 Jan 2004
Posts: 3345
Location: NorCal10/18/13 2:00 AM |
Usually the tolerance on ID of the steerer is less than +0.2mm, since it's rare for a typical 22.0 (French) steerer to accept any of the 22.2mm stems, even though the 22.2mm stems all seem to be slightly smaller than 22.2mm.
In the early-to-mid '60's, Many Schwinn road bikes came with a French-made 22.0mm alloy stem in a 22.2mm ID steerer, and that extra .2mm clearance by itself caused an alarming amount of freeplay and stressed the quill's expansion slot area to the point of cracking in many instances. Any more freeplay than that would be highly problematic from the get-go.
So this steerer seems to be really weird.
How did you measure the steerer? Did you measure at several angles to preclude the possibility of some ovalization having occurred?
Might the very end of the steerer possibly have been swaged down in diameter by a pipe-cutter?
Could a very dull and/or misadjusted die possibly have swaged down the ID of the entire threaded portion(?) (really doubting this myself, but it seems possible if the die concentrated force at one spot on the die's threads).
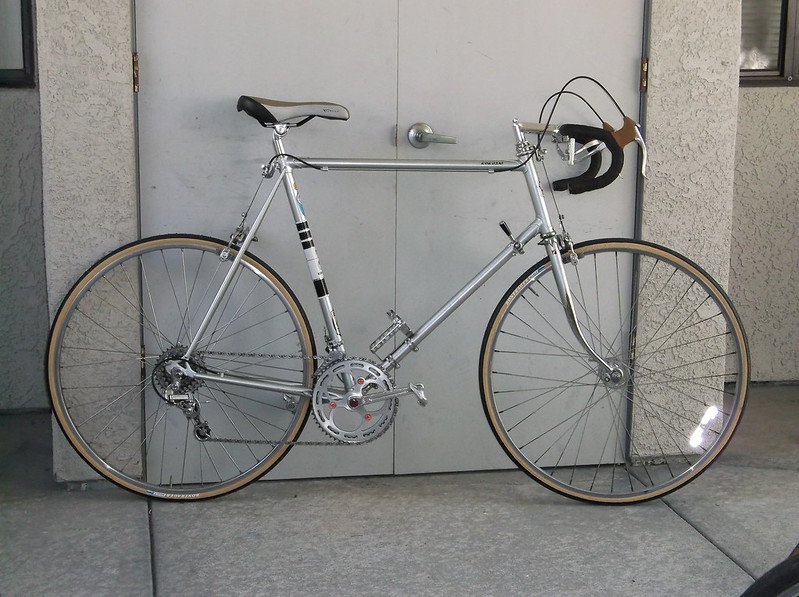
I've bought a few 110mmX21.1mm quill stems over the years for older Schwinn Supersports and a Nishiki International (AKA American-Eagle Kokusai).
Luckily someone made thousands of these stamped only "Compe Forged", now still found on certain older, cheaper, larger-framed bikes.
They seem to only show up in 60, 90 and 110mm sizes and feature an unusual 20-degree drop angle.
Englishman Gerry Burgess's brand (GB) made alloy road stems for many Raleighs and also for Schwinn.
There are GB stems machined down to .833"/21.1mm on many, many Schwinns, and it is notable that the quill's ID of both the 22.2mm and 21.1mm stems is identical (I measured it). That's not to say that all brands of stems have the quill thickness/strength to allow the quill to be
safely
machined down to .833"/21.1mm.
Notice here the text on the stem clamp and how I slammed the stem against the headset locknut to obscure the point where the quill OD tapers down sharply to 21.1mm. I tapered the ID of the locknutnut first to match the quill's taper so there is a gentler cone-shaped contact area between the quill and the locknut, for a more flex-free junction and better (more solid) look imo. This bike is a most-stable platform for a more sustained aero charge, and I do some relatively long pulls that tire my arms almost as much as my legs!
I've since scaled down the size of the freewheel shown even as the chainrings remain 54-48t.
Last edited by dddd on 10/18/13 11:55 AM; edited 3 times in total
|
|
|
|
|
|
|
|
Andy M-S
Joined: 11 Jan 2004
Posts: 3377
Location: Hamden (greater New Haven) CT10/18/13 7:38 AM |
Quite the shift levers!
(nm)
|
|
|
|
|
|
|
|
Sparky
Joined: 08 Dec 2003
Posts: 19083
Location: PDX10/18/13 10:26 AM |
"How did you measure the steerer? Did you measure at several angles to preclude the possibility of some ovalization having occurred?"
Dial calipers and yes...
|
|
|
|
|
|
|
|
dddd
Joined: 11 Jan 2004
Posts: 3345
Location: NorCal10/18/13 11:42 AM |
"Quite the shift levers!"
Beer-Tap levers, made by Shimano.
I think I had to cobble these together from a donor pair of stem-shifters onto a very old Shimano "333" model downtube clamp, but the levers themselves did come standard (on a stem mount) on the Nishiki brand's lower-level Azuki lineup of bikes iir.
Not retrofriction or ratcheting, these work pretty much incredibly well with the Suntour derailer over Uniglide freewheel cogs using HG chain.
I don't recall any sort of shifting combination that even approached this level of shifting ease back in those days of the 1970's.
This is just the setup needed for maintaining drive over steep rolling switchbacks on a bike that weighs all of 29 pounds :-Q>
Bob, your dial calipers have reliefs cut away from the jaw's surfaces adjacent to the caliper's slide beam, so it should be possible to compare measurements of both the cut end of the steerer's ID and the steerer's ID
below
the cut end, to check for any swage-down of the ID near the cut end.
This would be just a comparison, since the jaw's blunt 3mm width will of course not give a precise numerical ID measurement.
I am of course also assuming you've checked/measured the locknut's ID separately.
|
|
|
|
|
|
|
|
Sparky
Joined: 08 Dec 2003
Posts: 19083
Location: PDX10/18/13 12:10 PM |
The tips for ID measurements are tapered to a point as they should be. The first thing I checked for was a crimp ridge...
|
|
|
|
|
|
|
|
dan emery
Joined: 11 Jan 2004
Posts: 6890
Location: Maine10/18/13 1:51 PM |
shifters
Looks like the shifter on my old VW Bug.
|
|
|
|
|
|
|
|
Sparky
Joined: 08 Dec 2003
Posts: 19083
Location: PDX10/18/13 2:31 PM |
Yeah, them is some stylin bats there....
|
|
|
|
|
|
|
|
LeeW
Joined: 13 Jan 2004
Posts: 453
Location: near Baltimore, MD10/23/13 10:22 AM |
memories
brake-wheel cylinder hone?
You get that from a museum?
Wow, that brings back old memories of overhauling the drum brakes on a 68 Chevy I had in college. I think I might still have a timing light in the basement somewhere too!
|
|
|
|
|
|
|
|
Dave B
Joined: 10 Jan 2004
Posts: 4511
Location: Pittsburgh, PA10/23/13 10:41 AM |
quote:
Wow, that brings back old memories of overhauling the drum brakes on a 68 Chevy I had in college. I think I might still have a timing light in the basement somewhere too!
It also reminds me of overhauling the rear drum brakes on my '71 Datsun 510. What started as a couple of hour Friday evening job turned into a four day, three trips to the auto parts store ordeal.
I also still have my timing light, a Milton high intensity inductive pick up one whose flash could be seen on the house across the street in daylight. I bought it about two years before electronic ignition became standard and made timing lights, points, etc. instantly obsolete.
|
|
|
|
|
|
|
|
dddd
Joined: 11 Jan 2004
Posts: 3345
Location: NorCal10/23/13 11:35 PM |
"...electronic ignition became standard and made timing lights, points, etc. instantly obsolete..."
Transistorized ignition did make points obsolete, but the timing light is still useful, for those who do without a much more elaborate scope, when replacing or reinstalling a distributor or timing belt, when checking an advancer mechanism or when simply checking the timing at prescribed intervals (to compensate for wear and timing belt stretch).
Most professionals these days do have a scope of course, and I have to admit that I haven't checked my Isuzu's timing in about 20 years, even after doing a couple of timing belt replacements. As long as my gas mileage is good and the engine never knocks on regular gas, I figure It's good to go.
|
|
|
|
|
|
|
|
Brian Nystrom
Joined: 26 Jan 2004
Posts: 5101
Location: Nashua, NH10/24/13 4:49 AM |
Ummm...the timing belt...
...controls the
valve
timing, not the ignition timing. Ignition timing is controlled by the computer.
|
|
|
|
|
|
|
|
dddd
Joined: 11 Jan 2004
Posts: 3345
Location: NorCal10/24/13 12:37 PM |
Distributorless ignitions onthe newest cars are triggered by the crank sensor(s), but most cars continued to use distributors (which are usually driven off a camshaft) for many years after transistorized ignitions took over.
The camshaft, in turn, is kept in phase with the crankshaft via an adjustable (or self-adjusting) timing belt or chain which of course can cause variation in the camshaft and ignition's timing.
|
|
|
|
|
|
|
|
 CYCLING TECH TALK FORUM